FREE: 10 Must-Know Tomato Growing Tips Get The Guide
Read our affiliate disclosure here.
Use These 15 Tips to Prevent Blossom End Rot in Tomatoes
Since 2010, Tomato Dirt has garnered 4.8+ million views, making it the web’s leading online source for growing tomatoes in the home garden. Award-winning writer and Tomato Dirt owner Kathy Widenhouse has helped thousands of home gardeners grow healthier tomatoes. Be one of them when you get Tomato Dirt’s Growing Guide here.
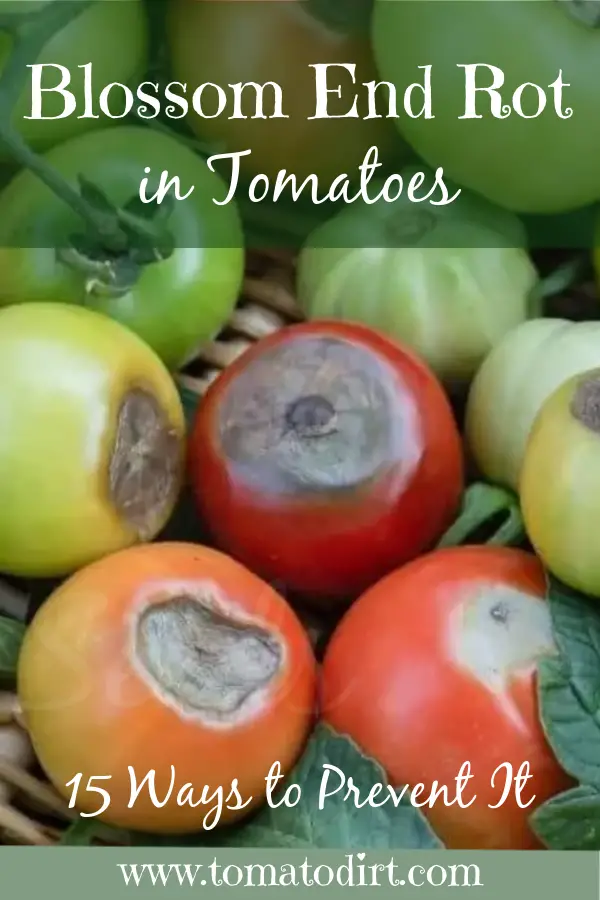
Blossom end rot in tomatoes is easy to recognize. You’ll see telltale leathery splotches on the bottom of the fruit. It’s the result of the tomato’s tissues breaking down.
A tomato with blossom end rot has not absorbed enough calcium – or absorbs calcium inconsistently.
Think of calcium as the glue that holds tomatoes’ cells together. You might figure that once calcium makes its way to a tomato fruit, then all will be smooth sailing. Not so.
The problem is that calcium moves slowly – at least slower than water. So as calcium is dragging itself through a tomato fruit’s cells, what happens? The “glue” doesn’t flow easily all the way through the entire piece of fruit? Top cells of the tomato bind together, but before the glue (calcium) has time to make it to the bottom of the fruit, the cells fell apart.
Hence the top of the fruit ripens normally. The bottom – not so much. Which is why you have those nasty sunken dark spots.
But now you know what causes the problem. And since you understand the problem, you can take measures to prevent it in your tomato crop. Use these tips to prevent blossom end rot in tomatoes.
15 ways to prevent blossom end rot in tomatoes
1. Choose varieties that are resistant to blossom end rot in tomatoes. A study by the University of Illinois reports that certain tomato varieties have less than a 10% incidence of blossom end rot: Celebrity, Fresh Pak, Jet Star, Manapal, Mountain Pride, Pik Red, Sunny, and Winter.
2. Harden off young seedlings gradually to protect them from extreme temperatures and conditions – say, over a period of 10-14 days rather than just 5-7. Stronger seedlings mean stronger root systems, which in turn allows for more consistent nutrient absorption.
3. Select a planting area with good drainage. Well-drained soil allows a tomato plant’s roots to extend deeply into the soil to gather calcium and other nutrients. Poorly-drained soil can water log your plants, effectively drowning them. In that instance, calcium is not absorbed … nor are any other nutrients, and the tomato plant struggles to stay alive.
4. Avoid setting out plants in cold soil. When they’re exposed to chilly soil and temperatures, tomato plants have to work hard simply to stay alive. Their systems slow. That includes their circulatory system. Wait for nighttime temperatures to be above 55°F and soil temperatures to exceed 60°F before planting. Use a soil thermometer to take your garden’s temperature.
If your garden is a bit chilly, you can help warm the soil by covering it with black plastic or garden fabric. Sun will warm the fabric which will in turn warm the soil. An added advantage to garden fabric: reduced weeds.
5. Check the soil pH before planting. Tomatoes thrive best in slightly acidic soil – that is, soil that measures between 6.2 and 6.8 on the pH scale where 7.0 is the middle of the road. You can do a quick-fix to alkaline soil by adding a 2-inch layer of sphagnum peat moss or by sprinkling lime over the area. If your soil is too acidic, add additional leaf compost. In fact …
6. Work in plenty of compost and organic matter into the soil before planting. Doing so provides extra nutrients to get the tomato plant off to a good start. And by cultivating the soil at least 10-12 inches deep, you create a healthy environment for roots to grow strong and deep.
7. Add a handful of quick-release lime to your tomato holes. Good quality garden lime is 37-40% calcium – a nice stash that makes the nutrient easily available for new tomato seedlings.
8. Water consistently. Reliable watering gives your tomato plants the best chance of consistent calcium uptake. Monitor rainfall and then top off those totals so that your tomato plants get 1-3 inches of water a week. Use a rain gauge to collect and measure rainfall in your garden bed. Then you will know how much additional water your plants need.
9. Water deeply. Shallow watering prevents root systems from driving deep into the ground. Instead, roots remain close to the surface and don’t absorb as many nutrients – like calcium – from the surrounding soil. You can help prevent blossom end rot in tomatoes by watering plants deeply a couple of times a week rather than superficially every day. Use a water usage meter to track how much water you’re giving your plants through your watering system.
10. Don’t overwater. See #4 above.
11. Mulch plants, once they’re established, to maintain moisture levels. Mulch prevents evaporation and helps keep the root system cool as summer temperature rise.
12. Use tomato fertilizer that is high in phosphorus (the second number in a fertilizer’s three-number series), like 4-12-4 or 5-20-5 – once fruit begins to emerge. Reason? Phosphorus encourages flowering and fruiting. Nitrogen encourages leaf growth. Too much nitrogen (the first number) or large amounts of fresh manure (which contains a good amount of nitrogen) after the plant’s early stages can prevent calcium uptake.
13. Spray plants directly with solutions containing calcium. Doing so places calcium directly where it’s needed: on the plants themselves. Look for fruit to mature to grape size. Then, use Tomato Rot-Stop (following manufacturer’s directors) or calcium chloride (sold commercially for other uses as de-icing salt or DampRid® Closet Freshener), with a concentration of 1 tablespoon per one gallon of water. Spray 2-3 times a week. Apply early in the morning when temperatures are cool. (Check out a good selection of garden sprayers here.)
14. Weed carefully. Try not to dig more than an inch or two deep around plants. Any deeper than that and you can damage the plant’s root system. Damaged roots mean plants struggle to move water and nutrients – including our sluggish friend calcium – through to the stems, leaves, and fruit. Use a hoe to gently remove weeds from around tomatoes or a hand cultivator to work fertilizer into the soil.
15. Remove affected fruit. The tomato plant can allocate its resources – like calcium – to the remaining tomatoes.
Blossom end rot is not just for tomatoes
Blossom end rot can also affect peppers, eggplant, summer squash, winter squash, cucumbers, zucchini, and melons. Use the same principles with those crops as you do to prevent blossom end rot in tomatoes. Your entire garden will be healthier. And you’ll have more fresh veggies to eat and to share with family and friends.
More Tomato Problems and How to Prevent Them
Help Your Tomatoes Set Fruit with These Tips ...
Why a tomato cracks and what to do about it ...
Are bumps on tomato stems harmful to plants?
Tomato sunscald: why too much sun can be hazardous to tomatoes...
Tomato Catfacing: How to Identify and Prevent It ...
More about blossom end rot: how to identify, treat, and prevent it ...
How to identify tomato problems and prevent them ...
See more examples of Blossom End Rot on our Pinterest Board...
Return from Prevent Blossom End Rot in Tomatoes to Tomato Dirt home
As an Amazon Associate and Rakuten Advertising affiliate I earn from qualifying purchases.
SHARE THIS PAGE:
FREE! 10 Must-Know Tomato Growing Tips: 20-page guide
Get yours here:


